Valentine Topiary Ideas That Add a Whimsical Touch
By the time February rolls around, my three boys are already bouncing off the walls from all the heart-shaped candy and classroom parties, so I like to keep our decor simple, playful, and fast. A valentine topiary is my secret weapon, because it looks fancy, but it’s really just a shaped plant or a cute ball of greenery or hearts on a stick in a pot. It stands up tall instead of spreading out all over the counter, so it fits in those tiny spots by the sink, on a shelf, or on the entry table, and I can move it in two seconds when someone starts a Lego project.
I love how topiaries make a space feel a little magical without turning my whole day into a craft marathon. They’re vertical, eye catching, and so easy to dress up with ribbon, felt hearts, or even paper the kids cut out at the table. In this post, I’ll share my favorite whimsical, budget-friendly ideas plus simple tips to pull them together fast. A lot of these projects are easy enough for kids to help with, so you get sweet decor and built-in memory-making at the same time!

What Is a Valentine Topiary and Why It Makes Decor Feel Whimsical

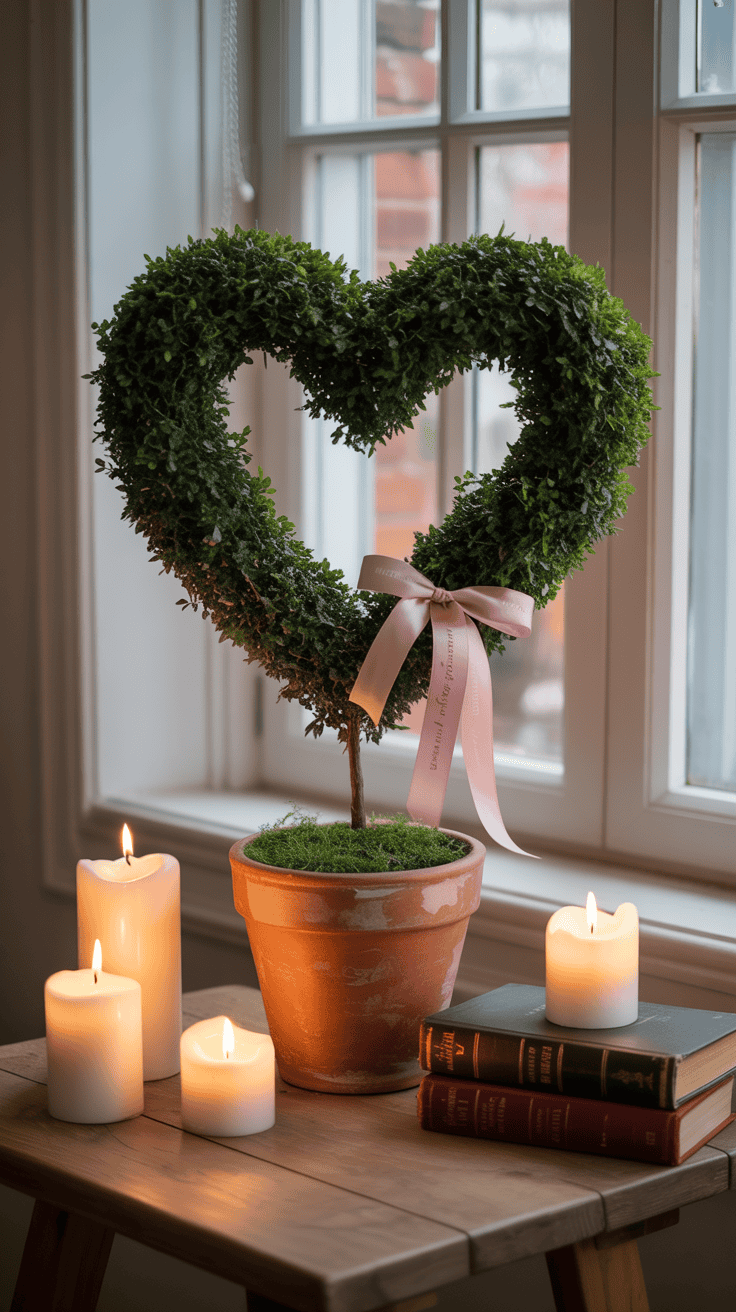
When I say I love a good valentine topiary, I am really just talking about a cute little “tree” of hearts or greenery that stands up tall and looks happy in any corner of the house. It has shape and height, so it feels special, but it does not take over your whole counter or table. That is my kind of decor as a busy mom.
At its core, a topiary is just a shaped plant or form on a stick in a pot. For Valentine’s Day, I like to think of it as candy on a stick for your eyes. Bright, sweet, and fun, without a sugar crash later. The best part is how easy it is to tweak the size, shape, and style so it fits your home, your kids, and your very real schedule.
Let me break down the basics so you can picture what will work in your space.
Topiary basics: Shapes, sizes, and styles that look cute (not cluttered)

Topiaries come in a few classic shapes, and once you see them, you cannot unsee them. They pop up everywhere.
Here are the simple shapes I reach for most:
- Ball: A round ball on top of a stick or dowel.
This one feels the most playful to me. It can look like a big gumdrop, a lollipop, or a scoop of ice cream. For Valentine’s Day, I like a foam ball covered in felt hearts, paper hearts, or faux greenery with tiny pink bows. - Cone: A cone sitting right in the pot, like a tiny tree.
This shape reminds me of a mini Christmas tree that went to a Valentine party. Picture a cone wrapped in ribbon or covered in heart stickers, almost like a little tree of hearts. - Spiral: A tall shape that twists around from bottom to top.
These feel a bit more fancy and formal. I like them for an entryway if I am keeping the rest of the area pretty simple. They can still be fun if you add red and pink ribbon, but I do not use this shape every time. - Two stacked balls: One ball on top of another, like a snowman.
This is a fun choice if you want a bigger “wow” piece without much extra work. It looks playful, but not over the top, especially if you keep the colors soft or stick to two shades.
For a whimsical Valentine vibe, I reach for round shapes first. Balls and stacked balls feel soft and sweet, like candy. Cones are my second favorite, because they look like tiny heart trees, which my boys think is hilarious for some reason.
Size matters a lot when you are trying to look cute, not cluttered. Here is how I think about it:
- Small topiaries:
Perfect for tight spots that still need a little love.
I use these on:- Bathroom counters
- Kitchen window sills
- Bookshelves or cubbies
They should be short enough that you can still open cabinets, and narrow enough that a kid can slide a hand past without knocking it over.
- Medium topiaries:
These work so well as a centerpiece or anchor.
I like them for:- Dining tables
- Coffee tables
- Nightstands
One is often enough in the middle of a table. If you use two, keep the rest of the decor simple so it does not feel crowded.
- Tall topiaries:
These are great for “hello, Valentine’s Day” moments.
I put them:- By the front door
- In the entryway
- On the floor next to a console table
One tall piece can make your space feel dressed up without a lot of extra stuff.
Now for styles. This is where you can match your home and personality.
- Farmhouse cute:
Think simple, cozy, and a little rustic.- Galvanized buckets, old tin cans, or white enamel mugs as pots
- Twine or jute wrapped around the “trunk”
- Soft greens with pops of red or blush pink hearts
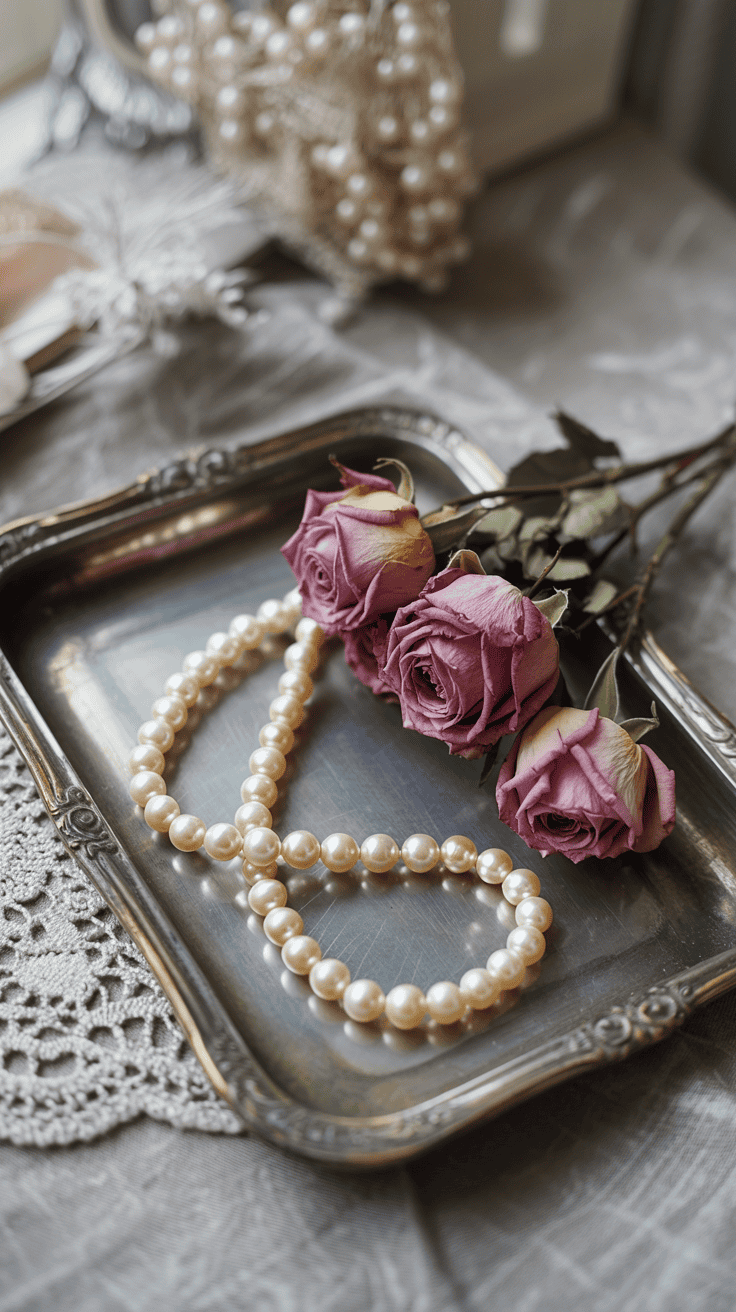
- Romantic and soft:
Great if you like a gentle, dreamy look.- Soft pinks, creams, and a little gold
- Lace, chiffon ribbon, or tulle tied in bows
- Roses, peonies, or rose-shaped felt flowers on the top
- Kid-friendly and bright:
This is my house most days.- Bright red and hot pink
- Fun ribbons, pom poms, and glitter hearts
- Plastic buckets, colorful mugs, or toy containers as pots
The goal is whimsical and cheerful, not fussy or stiff. If it feels like something the kids are scared to touch, it is probably too formal for a busy home. I like pieces that can survive a curious toddler hand and still look cute when I stand them back up.
Supplies I actually use as a busy mom (and what you can skip)

You do not need a full craft room to pull off a sweet little topiary. I usually grab a few basics, spread them on the table, and let the boys help with the safe parts while I handle the hot tools.
Here are the supplies I reach for most often:
- Pots or mugs:
Small flower pots, old mugs, leftover candle jars, or even a toy bucket. A chipped mug still works and actually looks charming. - Foam balls or cones:
These make the main shape for the topiary. You can find them in the craft aisle, but I have also used tightly crumpled paper or foil when I am in a pinch. - Wooden dowels or sticks:
These are the “trunks.” I use dowels, skewers with the sharp tip cut off, or even sticks the boys bring in from the yard. - Faux greenery or florals:
Little bits of faux eucalyptus, boxwood, or roses make everything look more finished. I often cut apart a cheap faux stem and spread it across a few projects. - Ribbon:
Thin ribbon for wrapping the trunk, wider ribbon for bows. Red, pink, white, and anything with hearts is fair game. - Felt and scrapbook paper:
These are my go-tos for hearts. We cut hearts, circles, or simple shapes and glue them all over the foam base. - Hot glue gun:
This is the fast way to make things stay put. I keep it far from little hands and only plug it in when I am ready to stick things quickly. - Scissors:
Regular scissors for ribbon and paper. I keep a duller kid pair handy so the boys can help without stress. - Filler for the pot:
You need something to hold the stick in place and hide the base. I use:- Moss
- Tissue paper
- Dry beans
- Rice
- Even small rocks from the yard
Budget-wise, I try to use what we already have. A few easy ideas:
- That lonely mug in the back of the cabinet can be a pot.
- A toy bucket can turn into a bright kid topiary.
- Old gift tissue can fluff up the base instead of new moss.
- Leftover ribbon from Christmas works fine with red and pink hearts.
If you do not have a hot glue gun, you can still make this work:
- For kid projects, I often swap in tacky glue or strong school glue. It just needs more drying time.
- Clear tape can help hold ribbon or paper hearts in place on the back side where no one will see it.
- Double-sided tape is great for quick heart stickers and paper details.
Safety is a big deal in our house with three boys zipping around. I keep a few simple rules:
- Hot glue and sharp scissors stay on the side of the table closest to me.
- Kids help with “soft jobs” like sticking felt hearts, pushing moss around the base, and choosing ribbon.
- We unplug the glue gun as soon as we are done and put it out of reach.
With a few basic supplies and a little flexibility, you can pull together topiaries that look sweet, feel personal, and do not eat up your whole afternoon. That is my kind of Valentine decor.
Whimsical DIY Valentine Topiary Ideas You Can Make in an Afternoon

When I say I love a good valentine topiary, I am really talking about simple, happy projects that I can knock out in an afternoon while my boys run circles around the table. These ideas look fancy on the counter, but they use easy supplies, simple steps, and lots of kid help. Perfect for busy moms who want pretty decor and real-life practicality at the same time!
Sweet heart topiary made from paper hearts and ribbon
This one is my favorite starter project because it is cheap, simple, and so cute. If you have paper, scissors, and some kind of ball shape, you are already halfway there.
Here is what I use:
- Foam ball or a tightly crumpled paper ball
- Wooden dowel, skewer with the sharp tip cut off, or a straight stick
- Colored or patterned paper
- Scissors and glue (school glue or hot glue)
- Ribbon
- Small pot, mug, or jar
- Filler for the pot like rice, beans, or dry pasta
First, I make the base. I push the dowel or stick into the foam ball to create a little “tree.” If I am using a crumpled paper ball, I tape it tight, then poke a small hole to hold the stick.
Then I let the boys help with the hearts. We:
- Cut out lots of small and medium hearts from colored or patterned paper.
- Fold each heart slightly down the middle so it has a little curve and does not lay totally flat.
- Glue the hearts all over the ball, points facing in different directions, until you cannot see the base.
The slight fold in the hearts gives the top a fun, fluffy look, almost like a bouquet. You can use soft pinks and creams for a sweet look, or bright patterns for a playful kid version.
To finish it up, I:
- Stick the bottom of the dowel into a pot or mug filled with rice or beans.
- Tie a simple bow with ribbon around the “trunk.”
- Add a little paper or tissue on top of the filler to hide it.
This project is a great first topiary because it is:
- Very affordable
- Kid friendly for cutting, folding, and gluing
- Easy to customize with colors, patterns, and ribbon
I like to tuck this one on the kitchen counter, on the mantel, or send it to school on a teacher’s desk as a sweet classroom gift. It looks thoughtful, but it is very manageable on a busy weeknight.
Felt ball and pom pom “candy” topiary that kids love
If your kids love bright colors, this “candy” topiary is such a hit. It looks like a giant gumdrop ball, but it is soft, squishy, and completely unbreakable, which my mom heart loves.
You will need:
- Foam ball
- Wooden dowel or stick
- Felt balls or pom poms in pink, red, white, and maybe a few pastels
- Glue (hot glue for you, school glue if kids help)
- Small pot, bucket, or mug
- Filler like rice, beans, or floral foam
If I have a minute, I paint the foam ball a matching color first, usually white or pink. This way, if there are tiny gaps between the pom poms, you do not see bright green foam peeking through.
Then I:
- Push the dowel into the foam ball to make the candy “tree.”
- Glue pom poms or felt balls all over the ball, as close together as I can.
- Let the kids choose color patterns, like stripes, random mix, or “only pink on this side.”
The key is to pack the pom poms tight. The closer they sit, the more it looks like one big, fluffy candy.
Once the top is covered, I:
- Put the dowel into the pot, secure it with filler, and press it in tight.
- Hide the filler with tissue, moss, or more pom poms scattered on top.
I like to let the boys “decorate” one side so they feel proud, and I clean up any big gaps later when they are off playing. This topiary makes such a cute centerpiece for a Valentine breakfast, a bright spot on a kid’s bookshelf, or a fun touch on a dresser. If it gets bumped or knocked over, nothing shatters, which is always a win!
Rustic farmhouse Valentine topiary with faux greenery and hearts

When I want something a little more grown-up, but still playful, I go for a rustic farmhouse style. It feels calm and pretty, and it blends in with regular decor so I do not have to pack it away right on February 15.
Here is what I grab:
- Small foam ball or floral foam in a pot
- Faux boxwood, eucalyptus, or other greenery picks
- Small wooden, felt, or paper hearts
- Toothpicks or thin floral wire
- Galvanized bucket, mason jar, or white ceramic pot
- Burlap, gingham, or simple cotton ribbon
I start by setting the foam in the pot or bucket. The foam should fit snugly so it does not wobble. Then I trim the greenery picks if they are long and stick them into the foam, working around the ball or filling the pot until it looks full and round.
Next comes the fun part. I:
- Glue or tape small hearts onto the top of toothpicks or short pieces of wire.
- Tuck the hearts into the greenery so they peek out here and there.
- Keep the hearts on the smaller side so the topiary still feels soft and natural.
For the base, I like to tie a simple bow around the pot with burlap or gingham ribbon. Nothing too big. Just enough to hint at Valentine’s Day without screaming it.
This style works so well:
- In an entryway to greet guests
- On a mantel beside framed photos
- On a kitchen shelf with cookbooks
If you want it to last longer, you can pull the little hearts out after Valentine’s Day and leave the greenery topiary as simple farmhouse decor. It feels like a two-for-one project, which makes my budget and my storage space very happy.
Conversation heart candy topiary that doubles as a treat
This one is pure fun. It has bright colors, a little nostalgia, and a tiny bit of sugar too. My boys think this is the coolest project, mostly because there is candy involved.
You can make this two ways.
Version 1: Decor-only candy topiary
For this version, the candy is glued on and not meant for eating.
You will need:
- Foam ball
- Wooden dowel
- Conversation hearts or similar small candies
- Hot glue
- Pot or mug with filler
I stick the dowel into the foam ball first. Then I glue the conversation hearts all over the ball, one by one, letters facing out when possible. It is a little like making a candy mosaic.
Once the ball is covered, I secure the dowel in the pot with filler and add a bit of ribbon. This version lasts longer and works great as a centerpiece for a Valentine party or playdate.
Version 2: Snack-friendly candy topiary
For this version, the candy stays loose, so people can grab a few pieces.
Here is what I use:
- Clear glass jar, vase, or wide drinking glass
- Wooden dowel or straw for the center
- Bag of conversation hearts or other small candy
- Simple heart topper (paper heart on a stick, felt heart, or small foam heart)
I place the dowel or straw in the center of the glass and hold it in place. Then I pour the candy around it, layering until the jar is full and the stick feels secure. At the top of the stick, I attach a heart topper.
The whole thing looks like a topiary growing out of candy. It is adorable on a snack table, for a family movie night, or next to popcorn and drinks.
With both versions, I stay very clear about candy rules around little kids. In our house, I:
- Keep candy topiaries up high when my youngest is nearby.
- Offer pieces only when we are right there.
- Use the glued version in rooms where the boys are less likely to sneak a taste.
When I grab the candy on sale after the holidays, this project stays very budget friendly, but it feels extra special.
Mini Valentine topiaries in mugs and jars for tiny spaces

Sometimes you just want a tiny pop of happy on a desk or nightstand. Mini topiaries are perfect for that. They use scraps, they are fast, and they make such sweet little gifts for the people we love.
I like to raid my cabinets and pull out:
- Extra coffee mugs
- Jelly jars
- Small yogurt pots or pudding jars
- Old candle jars, cleaned out
Once I have a few small containers, I make a couple of quick styles.
Simple felt heart mini topiary
For this one, I use:
- One felt heart or two hearts glued back to back
- A skewer, lollipop stick, or short dowel
- Filler like rice, beans, or tissue
- A pinch of moss or crumpled tissue on top
I glue the heart to the top of the stick, place the stick in the mug or jar, then fill around it to hold it steady. A tiny bow at the base of the heart finishes it. It is simple, but it looks very sweet on a bathroom counter or a child’s nightstand.
Tiny greenery sprig with a “love” tag
For a more subtle look, I grab:
- A small faux greenery sprig
- A little charm, wood heart, or paper tag that says “love”
- Thin ribbon or twine
I tuck the greenery into the jar with filler, then tie the charm or tag near the top with twine. It gives just a hint of Valentine’s Day without a lot of bright red, which is nice for an office or a shared space.
These mini topiaries are perfect when you:
- Need a fast teacher gift
- Want something small for grandparents
- Want to surprise a neighbor with a little pick-me-up
They use up scraps of ribbon, leftover hearts, and random mugs that do not match anything anymore. I love that I can make a whole group of them in under an hour, usually with at least one boy at the table helping, and they still look thoughtful and special.
Simple Styling Tips: Where to Put Your Valentine Topiaries for Maximum Magic

Once you have a cute valentine topiary ready, the fun part is finding that perfect little spot where it can shine and still work with real family life. I like to tuck mine into places we use all day, so they feel like small happy surprises instead of fancy museum pieces we are scared to touch.
Entryway and front door: a happy Valentine welcome

The entry is the first thing you see when you walk in with kids, groceries, sports gear, and fifty other things. Mine is never perfect, but a topiary or two by the door instantly makes it feel more pulled together, even if there are three backpacks on the floor.
I like to use one or two taller topiaries in this area. They frame the space and draw the eye up, so you notice the cute decor first and the random shoe pile second. A few easy ideas:
- Place a tall topiary on each side of an entry table or small bench.
- Use a single tall one at one end if your table is small or against a wall.
- Tuck a woven basket under the table for shoes, so the whole area looks styled on purpose.
If you have a little entry table, a small topiary next to the drop zone is such a simple touch. I keep a shallow bowl or tray for keys, extra change, and lip balm. Then I put a sweet mini topiary right beside it. That tiny bit of green and pink makes the whole mess feel less chaotic.
For busy doorways, I try to keep my containers sturdy and not too precious. A heavy ceramic pot, a metal bucket, or even a chunky basket with a liner works well. My boys can run in and out, and if someone bumps it, it usually survives.
If you have a porch or front stoop, topiaries out there create the cutest Valentine welcome. You can:
- Use weather-safe pots, like plastic or resin, so they do not crack in the cold.
- Fill them with faux greenery and hearts, so you do not have to worry about frost.
- Add a little outdoor-safe ribbon or a painted wood heart sign for color.
I like to keep porch topiaries simple and sturdy. Faux plants are your best friend in winter. They stay bright, they do not care about snow, and you do not have to remember to water anything while you are helping with homework.
Most of all, I try not to stress about perfection by the door. There are days when there are cleats, a scooter, and three random socks in that spot. The topiary still makes it feel like I tried, and that is enough for this season of life.
Kitchen, dining table, and coffee bar: heart filled family moments

The kitchen is where we live, so it is also where I like to sneak in the most Valentine magic. A simple topiary on the table or counter turns normal food into a mini celebration, even if it is just store-bought pizza.
For family meals, I love a medium topiary as a centerpiece. It looks special, but it does not take over the whole table. I reach for styles that are:
- Low or narrow, so kids can see each other across the table.
- Stable, so if someone bumps the table while reaching for ketchup, it stays upright.
- Easy to move to the side if a giant coloring project or puzzle appears.
On our dining table, I often set the topiary on a simple tray. Then I add one or two small things around it, like:
- A little jar of crayons for kids.
- A tiny candle in a safe holder for dinner after bedtime.
- A small dish of heart candies for a special treat.
The same tray trick works so well for a pancake breakfast bar or Sunday brunch. I set a topiary in the middle, then slide syrup, sprinkles, and fruit around it. The tray keeps everything together, and when breakfast is done, I can move it back to the counter in one swoop.
If you love hot drinks like I do, a Valentine cocoa or coffee bar is such a fun touch. I keep it very simple:
- A medium or small topiary at the back or to one side.
- Two or three cute mugs.
- A small candle or fairy light jar for a little glow.
- A bowl of marshmallows or heart sprinkles.
Everything sits on a tray or cake stand, so it looks pulled together but still easy. The kids think it is so special when they can grab a mug and make their own cocoa under the “Valentine tree.”
For family nights, I let the topiary stay in the middle of the table while we have:
- Pizza night with paper plates.
- Game night with cards and board games.
- Movie snack night with popcorn and candy bowls.
The topiary makes even the messiest table feel like a celebration. I tell myself I am not styling for a magazine, I am styling for my actual family. If the ribbon on the topiary gets a little crooked or someone adds a Lego, it just becomes part of the memory.
Living room, mantel, and kids’ rooms: cozy corners with a little sparkle

The living room is where we pile on the couch, watch movies, and spread blankets everywhere, so I want the decor here to feel cozy and easy. A simple way to do that is to build small vignettes with a topiary, a few favorite items, and a tiny pinch of sparkle.
On the mantel or a side table, I like to group:
- One topiary.
- One framed family photo.
- One extra item, like a book stack or a small candle.
Three pieces usually feel balanced and not fussy. I often mix heights too. The topiary gives height, the books or candle sit lower, and the photo leans or stands in between. Odd numbers of items tend to look more relaxed and natural.
If I want a bit of magic, I add a short string of fairy lights and tuck it around the base of the topiary and books. The glow at night is so sweet, and it makes the room feel ready for a cuddle and a movie.
For the kids’ spaces, I keep things fun and very kid friendly. A few ideas that work well in our house:
- A small topiary on a bookshelf next to a stack of Valentine picture books.
- A mini topiary on top of a dresser tray, where little hands cannot easily grab it.
- A soft pom-pom style topiary on a toy shelf, so if it falls, nothing breaks.
In the boys’ rooms, I let them pick the colors and a few details. They love adding little touches, like:
- A tiny car parked by the pot.
- A small paper heart with their name.
- A superhero sticker on the back where only they know it is there.
Those details make it feel like theirs, not just mom’s decoration.
When I am placing topiaries in any room, I think about three quick things:
- Height: Mix tall and short pieces so your eye moves around the space.
- Number: Use odd numbers of items, like 1, 3, or 5, so it feels casual.
- Breathing room: Leave a little open space so it does not feel crowded.
I do not treat this like a formal design rule, more like a gentle guideline. If something looks off, I slide pieces around until it feels right. If my kids already love it, I leave it and call it done.
Valentine decor should feel playful and light, not like another big project on your list. A few topiaries in the right spots can make your home feel warm and loved, even when there are socks on the couch and crayons under the coffee table. That little bit of whimsy is worth it.
Making Valentine Topiary Crafts With Kids Without Losing Your Mind

Letting kids help with a valentine topiary sounds adorable, until someone spills glitter, another child glues their sleeve to the table, and the baby is chewing on a pom pom. I have been there more than once. The sweet spot is simple projects, quick wins, and a big focus on memories instead of perfection.
I try to remind myself that my boys are not judging the finished topiary. They are just happy to sit with me, cut hearts, and argue over who gets the red pom poms. If I keep the projects short, the supplies basic, and my expectations low, we all have a much better time.
Kid friendly topiary projects that are actually doable
Some topiary ideas are made for Pinterest, not for real life with small kids. I like to stick with projects that tiny hands can actually help with, without everyone crying by the end.
Here are the styles that work best with kids:
- Paper heart topiaries
Simple, flat, and light. Kids can glue or stick hearts on, even if they are a little crooked. - Pom pom or felt ball topiaries
Soft, squishy, and forgiving. Gaps or uneven spots still look cute. - Foam heart “trees”
Foam hearts with peel-off backs are a lifesaver. Kids feel like they are using stickers, but you still get a finished topiary.
For younger kids or short attention spans, I set everything up ahead of time. A few helpful tricks:
- Pre-cut shapes:
I cut a pile of hearts in different sizes the night before. That way, little kids can go straight to sticking instead of wrestling with scissors. - Use stickers instead of glue:
Heart stickers, foam stickers, or those foam hearts with sticky backs keep things neat. Kids get the fun of “gluing” without the puddles. - Limit color choices:
I put out 3 colors at a time. Too many options, and my boys start arguing instead of sticking.
Two super fast kid projects that only take 5 to 10 minutes:
- Speedy paper heart topiary in a cup
- Stick a paper or wooden skewer in a lump of playdough or modeling clay in a paper cup.
- Tape or glue a big paper heart to the top of the stick.
- Let kids add heart stickers to the cup and the heart.
Done. It is simple and looks adorable on a nightstand.
- Mini pom pom “bush” topiary
- Fill a small jar or cup with tissue paper.
- Let kids glue or stick pom poms all over the top so it looks like a little fluffy bush.
- Add one bow or ribbon around the cup if you want to dress it up.
If your kids lose interest fast, set a timer. I say, “We are going to decorate this tree for 7 minutes,” and then we are done, even if it is not perfect. The goal is to enjoy the moment, not finish a museum piece.
I have to remind myself often: this is about the process, not the picture. Someday my boys will not remember if the hearts were straight. They will remember that we sat at the table together, talked about their school crushes, and made something silly and sweet.
Mess control, safety tips, and sanity savers for busy moms
The only way I survive craft time with three boys is to control the mess before it starts. If I can set up the space well, I am so much calmer when someone spills sequins everywhere. I expect mess, I just give it boundaries.
A few tricks that help every single time:
- Cover the table
I grab a cheap plastic tablecloth from the dollar store or a trash bag cut open. When we are done, I roll it up with the crumbs, paper bits, and dried glue, and toss it. - Use trays or baking sheets
Each kid gets a tray, a cookie sheet, or even a large paper plate. All their hearts, pom poms, and scraps stay inside that space. It cuts down on the “He stole my supplies” fights too. - Pick glue sticks when you can
Glue sticks are my best friend. Less dripping, less drying time, less sticky hair. I save liquid glue for older kids or spots where it is really needed.
Safety is a big deal at my house, especially with a wild toddler running around. A few simple rules keep everyone safe:
- Separate sharp and hot tools
Scissors, hot glue guns, toothpicks, and skewers stay on my side of the table. I pass them over only when I am watching that child. - Store tools high when not in use
When we take a break, I unplug the hot glue gun right away and put it on top of the fridge or in a high cabinet. Same with scissors and skewers. - Swap sharp picks for safer options with little kids
For toddlers, I use craft sticks instead of toothpicks and dull kid scissors instead of my sharp ones.
If you have toddlers underfoot while older kids work, they can still join in without touching the “real” project. A few sanity savers:
- Give toddlers big scraps and stickers
I hand my toddler a pile of big heart cutouts, crayons, and a sheet of stickers. I tape a big sheet of paper to the table so he can go wild while the older boys work on the topiary. - Use a “yes” box
I keep a small basket of safe, touchable stuff like ribbon scraps, cardboard tubes, big foam hearts, and old plastic lids. The toddler can dig, stack, and play without me saying “no” every two seconds. - Seat them close, but not in the middle
I seat the toddler at the end of the table, with his own tray, away from the hot glue and scissors. He feels included, but he is not grabbing every supply.
When clean-up time hits, I keep it simple:
- Kids put all trash on their tray or baking sheet.
- We dump scraps into the trash in one go.
- Markers, stickers, and extra hearts go into one small bin labeled “Valentine,” so I can pull it out again next year.
The truth is, our kids will not remember if the tablecloth matched or if the moss got everywhere. They will remember that we laughed when glue got on someone’s nose, that a pom pom rolled across the floor, and that mom sat down with them instead of hovering with a broom. The mess fades fast. The time together sticks.
Quick FAQ: Common Valentine Topiary Questions From One Mom to Another
I get the same questions every year when I start pulling out my valentine topiary projects, so I thought it would be fun to share what actually works for me as a mom of three busy boys. Think of this as a quick chat at the kitchen counter while the kids argue over whose turn it is to pick a show.
How long does a Valentine topiary take and how early can I put it out?
Most of my topiaries fall into three time buckets, which is the only way my brain can handle planning decor around school runs and sports.
Here is how I break it down:
- 15 to 20 minutes:
Simple paper heart trees in mugs, mini felt heart sticks in jars, or quick greenery with a few heart picks. These are perfect for a random weeknight when you only have one episode of a kids’ show to work with. - 30 to 40 minutes:
Pom pom or felt ball tops, small greenery topiaries with little hearts, or mini sets of topiaries for a shelf. This is my sweet spot for a Saturday afternoon while the boys build Legos on the floor. - 45 minutes to about an hour:
Bigger centerpiece topiaries, candy-covered tops, or anything with more detail and layers. I usually do these when my husband can run interference or during nap time when the house is slightly quieter.
If you feel overwhelmed, start with one simple topiary. Pick a mug, cut a handful of hearts, and make a tiny tree for your kitchen counter. Once you see how easy it is, it feels a lot less scary to try a bigger one later.
As for timing, I usually start putting out Valentine decor:
- Right after I take down the last of the winter stuff,
- Or about two weeks before Valentine’s Day if life is crazy.
Some years I am on it in mid-January. Other years I blink and it is February 10, and that is fine too.
I also keep a lot of things up longer than the actual holiday. Soft pinks, hearts, and greenery feel sweet through the end of February. If it makes your home feel cozy and happy, you absolutely get to keep it up. Your house, your rules. No decor police here.
What can I do if I do not have a lot of craft supplies or money?
I am a big fan of pretty decor that does not wreck the budget. Kids eat a lot, so my projects usually start with things I already have.
Some of my favorite low-cost tricks:
Reuse Christmas greenery
That little faux tree or leftover garland can turn into a Valentine topiary in minutes. Snip off a piece, pop it in a jar or mug, tie on a pink ribbon, and tuck in a few paper hearts.Cereal box hearts
I save cardboard from cereal boxes, crackers, and snack boxes. Cut out hearts, paint them, or cover them with kids’ drawings. Glue or tape them to skewers or sticks and plant them in a jar of rice.Mason jars and mugs as pots
Old jelly jars, chipped mugs, and lonely teacups make the cutest bases. No one sees that tiny chip once the topiary is in there. I actually think it adds charm.Easy fillers instead of floral foam
You do not need fancy foam to hold your stick in place. Try:- Dry beans or lentils
- Rice
- Sand or pebbles from the yard
- Scrunched-up paper or grocery bags
Pack it tight and cover the top with tissue, moss, or even more paper scraps, and it looks great.
When I want to stretch every dollar, I go hunting:
- Thrift stores are gold for cheap pots, mugs, baskets, and jars.
- Dollar stores are wonderful for ribbon, foam shapes, and seasonal picks.
- My own house is the best shop of all. I walk room to room and grab:
- Old containers
- Leftover ribbons
- Random jars and tins
- Gift tissue I saved from birthdays
Please do not feel bad if your supplies are simple or mismatched. Your kids will not remember that you used beans instead of floral foam. They will remember that you sat down and made something together. Love and creativity count so much more than perfect, magazine-ready supplies.
How do I store my Valentine topiaries so they last until next year?
If I am going to spend nap time building something cute, I want it to survive more than one year. The good news is, a little care when you pack things up goes a long way.
Here is what works well in our house:
- Wrap the tops
I gently wrap the topiary heads in tissue paper or soft paper towels. If it has lots of small hearts or pom poms, I give it an extra soft layer. No tight squeezing, just a loose little “nest” of paper. - Use shoe boxes or plastic bins
Smaller topiaries fit nicely in old shoe boxes. Taller ones go in clear plastic bins so I can see what is inside. I stand them up if I can, or lay them on their side with plenty of padding. - Stuff the empty spaces
I tuck crumpled paper or light bubble wrap around each topiary so it does not slide around. Even grocery bags work. The goal is to keep it from bumping and bending when the box moves. - Label everything clearly
I jot a quick label on the side like “Valentine topiaries” or “Hearts and ribbons.” Next February, my future tired self is very grateful. No digging through ten mystery bins.
Some pieces can do double duty, which saves both space and money. I often:
- Gently pull out removable hearts or picks from a greenery topiary.
- Keep the base and the green top as a “plain” piece for spring or everyday decor.
- Add different picks or ribbons for Easter or summer.
If a project is very big or fragile, sometimes I store only the base and trunk, then remake the top next year with fresh hearts or candy. That way I get the fun of a new project without buying a new pot or dowel every time.
The goal is not perfect storage with color-coded bins. The goal is “good enough so things do not get crushed and you do not lose your mind next year.” If you wrap it, cushion it, and give it a clear label, you are already winning.

Conclusion
At the end of the day, all these cute ideas come back to one simple thing: a valentine topiary is just a sweet little “tree” that makes our noisy, toy-filled homes feel a bit more magical without adding more stress. I love that I can look around at the Legos, snack crumbs, and soccer cleats, then spot a tiny heart tree on the table and think, “Yep, there’s still some cozy charm in here.”
You don’t need to tackle every single idea at once. Pick one simple project that fits your energy right now. Maybe it’s a paper heart topiary in a chipped mug, a pom pom “candy” tree for the kids’ room, or a tiny greenery pot with a few hearts tucked in. Let your kids help, even if the hearts are crooked and the ribbon is wonky. They’ll remember the time at the table with you, not whether the moss lined up just right.
If you try anything from this post, let it be this: grab some paper hearts or pom poms, pull out a mug or jar, and make one tiny topiary today. Then set it on the counter, pour yourself a hot cup of coffee, and enjoy that little pop of whimsy while the kids race circles around you. That small bit of happy is worth it, and you absolutely deserve it!
This post may contain affiliate links. Read the full disclosure here.


I love your ideas and want to use one for a bridal shower I’m hosting in April. Where do source your hearts? Most of the ones I’m finding are flat on the back for wall mounting. Since I’ll be using round tables, I want to find some 3D hearts that are approximately 9″ to cover with moss. I’ve looked on Amazon and haven’t had much luck finding what I need. Any suggestions would be greatly appreciated.
Thanks for your help.