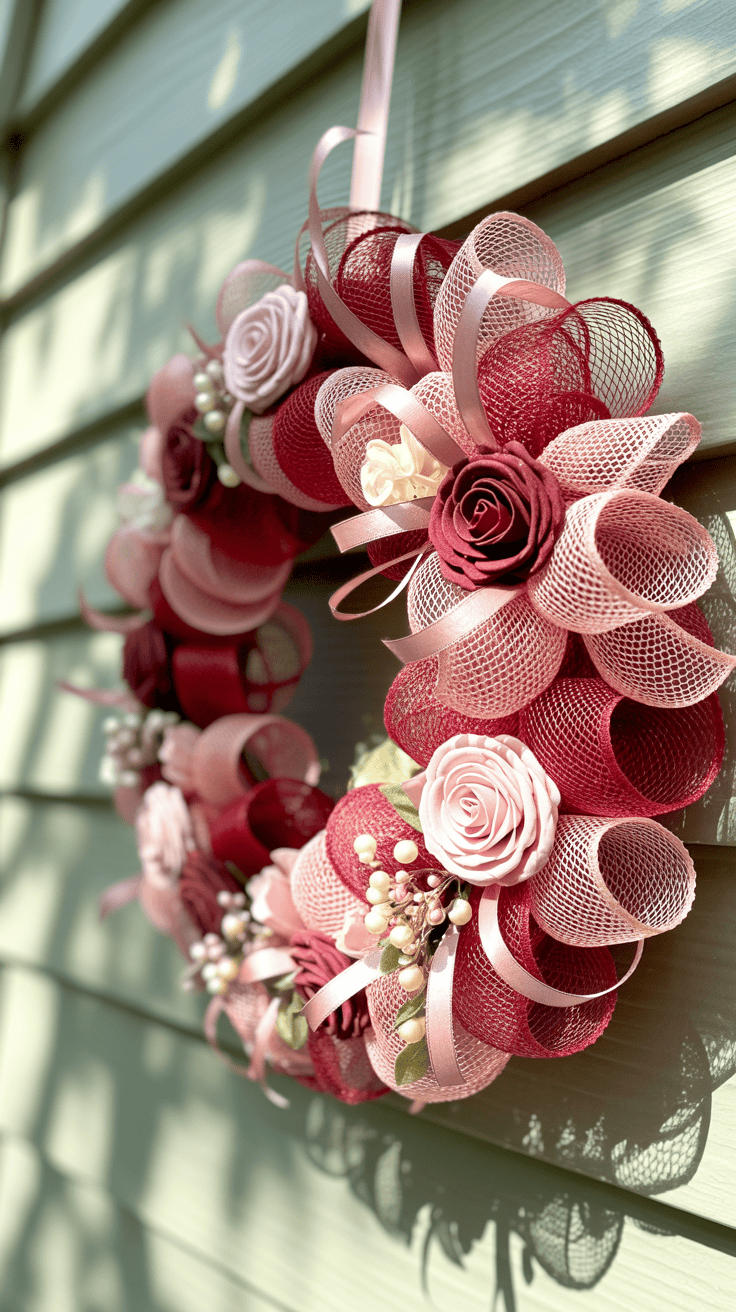
Deco Mesh Valentine Wreath You Can Make in a Day
By the time my three boys are finally quiet, the couch is covered in toy cars, someone’s sock is on the lamp, and I’m just craving one pretty corner that feels like Valentine’s Day. That’s exactly why I fell in love with making a deco mesh valentine wreath I can finish during nap time or after bedtime, without turning the whole house into a craft store explosion.
I don’t have hours to fuss with tiny details, and I’m guessing you don’t either. This project is beginner friendly, simple to learn, and easy to pause if someone suddenly needs a snack, a snuggle, or a referee. If you can wrap, twist, and tie, you’re in great shape already.
I also have to watch our budget, especially with three growing boys who eat like teenagers. So I kept this wreath very budget conscious, with supplies you can grab at Walmart, Dollar Tree, or a quick craft store run. It’s also super flexible, so you can swap ribbon colors, add hearts, or go less pink if your house is full of boys too.
In this post, I’ll walk you through the supplies list, simple step-by-step instructions, fun ways to customize your wreath, and a smart way to store it so it looks fresh next year. Stick with me, and you really can make this in just one day!

Why This One‑Day Valentine Wreath Is Perfect for Busy Moms

This little one‑day deco mesh valentine wreath project fits so well into real mom life, I almost feel like it was made for those of us who are juggling kids, snacks, laundry, and maybe a lukewarm cup of coffee. It feels special and festive, but it does not take over your whole day or your whole kitchen table. You can start it, stop it, and pick it back up when someone needs a snack refill or a diaper change.
Fast, forgiving, and beginner friendly

I love this wreath because it is so forgiving. Deco mesh has this fluffy, bouncy look that hides a lot of little mistakes. If a loop is a bit crooked, or one side is a tiny bit fuller, it just looks extra cute and full, not wrong.
When I made mine, I noticed a few spots where my loops were not the same size at all. I almost pulled it apart, then I stepped back and looked again. Instead of looking messy, it looked plush and playful, which is exactly what I want for Valentine’s Day decor with three wild boys running around.
Here is what makes it feel so easy and low pressure:
- You do not need perfect hands. If you can bunch, twist, and fluff, you are fine.
- Mesh fills in gaps on its own. The texture naturally covers any awkward spots on the wire frame.
- Imperfections = personality. A little tilt or uneven puff just makes it look more handmade and sweet.
I also love that this is not a “pro only” kind of project. You do not need a fancy craft room or a wall of tools. I used:
- A simple wire wreath frame
- A few rolls of deco mesh
- Pipe cleaners or zip ties
- Scissors
- Ribbon and a few cute hearts
That is it! No special machine, no hot glue gun if you do not want to use one, and no tricky technique that takes hours to learn.
The whole process is just:
- Attach mesh to the frame.
- Make loops.
- Twist to secure.
- Fluff as you go.
You can absolutely do this in one afternoon or one cozy evening after bedtime. I spread mine out on the living room floor, turned on a show, and worked while the boys finally stayed in their beds. It felt relaxing, not stressful.
The best part is that when you hang it up, nobody will be looking for perfect spacing or flawless loops. They will see a big, fluffy heart-filled wreath and think, “Wow, that looks adorable,” and that is all that matters.
Budget friendly decor you can reuse every year

Store‑bought Valentine wreaths can be so expensive. I have picked them up before, flipped the tag, and quietly put them right back. When you are feeding multiple kids, it is hard to justify a $40 or $50 wreath that only hangs for a few weeks.
Making my own lets me control the cost, which I really like. I watch for:
- Deco mesh on sale at craft stores
- Coupons for ribbon
- Seasonal clearances right after holidays
- Affordable finds at Walmart or Dollar Tree
You can build a very cute wreath with just a few rolls of mesh and one or two ribbons. If you want to go bigger later, you can always add more, but you do not have to go overboard to get a nice full look.
I also think of this wreath as reusable decor, not a one‑year thing. Once it is done, you can pull it out every February and hang it on:
- Your front door
- A pantry door
- Above a mantle
- In the kids’ playroom
I store mine in a plastic bin or a large bag so it does not get squished too badly, then I fluff it up the next year. Deco mesh holds up surprisingly well when you treat it kindly.
Another little bonus is how flexible the supplies are:
- Leftover mesh can be used to make mini wreaths, vase fillers, or bows for gifts.
- Extra ribbon can go on teacher gifts, treat bags, or future projects.
- If a section of the wreath gets crushed or pulled by curious little hands, you can fix that one spot with leftover pieces instead of tossing the whole thing.
So instead of buying a pricey wreath that is stuck the way it is, you create something you can refresh and reuse year after year. That feels smart and creative, not wasteful.
Kid approved and family friendly

My boys get so excited when new holiday decor pops up around the house. It is like they think the house is throwing a party just for them. This Valentine wreath was no different. The minute they saw the red and pink mesh, they were all in.
I do not let them handle sharp tools, of course, but there are plenty of safe jobs they can “help” with:
- Picking out ribbon patterns at the store
- Choosing little hearts or signs to add
- Passing pipe cleaners or zip ties to me
- Helping fluff the mesh once it is attached
Letting them be part of it makes the whole project feel more special. Is it calm and peaceful? Not always. Sometimes someone starts fencing with the deco mesh roll or tangles a ribbon around the dog. But that is real life, and honestly, it is part of the fun.
To keep it kid friendly and still get a wreath that looks nice, I like to:
- Set out only the supplies I am using right then.
- Keep scissors and wire cutters far away from little hands.
- Give them simple tasks like “Can you hand me three pipe cleaners?”
- Let them pick one or two “kid choices” for the wreath, even if it is a little wild.
When we hang the wreath on the door, they are proud. They point it out to anyone who comes over and say, “We helped make that!” It becomes more than just decor. It is a memory and a tiny team project.
If you are a busy mom who wants something pretty, quick, and not stressful, this one‑day wreath really checks all the boxes. It fits around naps and homework, it does not wreck your budget, and it lets your kids join in without everything turning into chaos, at least not too much chaos.
Supplies You Need for a Full, Fluffy Valentine Deco Mesh Wreath

Before I start any project, I like to spread everything out on the kitchen table so I can see what I’m working with. The same goes for a deco mesh valentine wreath. Having the right supplies ready makes the whole process smoother, quicker, and a lot less frustrating when a kid suddenly yells for a snack in the middle of a ribbon cut.
You really only need a handful of core items to get a full, fluffy wreath. Then you can sprinkle in pretty extras to fit your style and your home.
Core wreath supplies (what you absolutely need)
If you’re keeping things simple and budget friendly, these are the things I’d call non‑negotiable. With just this list, you can make a beautiful wreath that looks full and finished.
Wire wreath form
I like a 14–16 inch wire wreath form for a front door. It is big enough to make a statement, but not so big it eats up all your mesh. The metal rings give you a sturdy base and clear sections to attach your mesh to, which makes it easier to space things out.
Deco mesh rolls
This is where all that fluff and fullness comes from.
- Look for rolls that are 10–21 inches wide.
- For one nice, full wreath, plan on 2–3 rolls at least.
- I like a mix of solid colors and patterns (like hearts, stripes, or polka dots).
Wider mesh (21 inch) gives you big, soft loops and covers the frame fast. The 10 inch size is great for extra layers or accent colors. Mesh is also forgiving, which is perfect for tired mom hands that are not aiming for perfect.
Pipe cleaners or zip ties
These are your little workhorses.
- Pipe cleaners are soft, easy to twist, and great if you like to adjust as you go.
- Zip ties are stronger and very secure, which is nice if kids like to tug.
Both hold the mesh in place on the wire frame. I keep a handful already cut and ready in a small bowl so I am not hunting for them every two minutes.
Craft scissors
A sharp pair of scissors makes life so much easier. You will use them to cut mesh, ribbon, and pipe cleaners. Dull scissors chew up mesh and leave ragged edges that snag and fray more, so if yours are tired, this is a good time to upgrade.
Wire cutters (if needed)
If your wreath form has thicker wire or you use heavy floral wire for accents, wire cutters help a lot. I keep a small pair in my supply box. I do not always need them, but when I do, I am glad they are there.
Once you have these basics, you can make a full wreath that already looks great. Everything else is just fun on top.
Pretty extras that make your wreath feel special
The extras are what turn a basic project into something that really feels like you. This is also where kids love to get involved, because they see hearts and sparkles and instantly have opinions.
Here are some of my favorite add‑ons.
Valentine ribbon (wired is best)
Wired ribbon is my secret weapon. It holds its shape so well and makes pretty bows or little ribbon tails that stand out instead of drooping.
I like:
- 1.5–2.5 inch wired ribbon in Valentine prints.
- Patterns like hearts, polka dots, stripes, or simple “Love” prints.
You can tie bows, loop small pieces into the mesh, or make a big main bow for the bottom or side of the wreath.
Heart picks
These are those little hearts on sticks you see in the seasonal aisle. I slide them into the mesh and secure the stick to the frame with a pipe cleaner or zip tie.
One year, my boys picked out sparkly red and pink heart picks. They did not match my original plan at all, but they looked so fun and playful that I used them anyway. It ended up being one of my favorite parts of the wreath.
Foam or wood hearts
Flat foam hearts or wood hearts are great if you want something that sits a little more flat against the wreath. You can:
- Hot glue them to the mesh.
- Punch a small hole and tie them on with thin ribbon or string.
They add color without a lot of bulk.
Small Valentine sign
A cute little sign with “Love,” “XOXO,” or “Happy Valentine’s Day” makes the wreath feel finished. I usually place mine slightly off‑center so the wreath looks more playful.
One year I used a white “Love” sign with red glitter edges. I wired it right across the middle, and it pulled the whole design together.
Glitter accents
A little glitter is fun. A lot of glitter lives on your floor for weeks. I go for a few glitter hearts or a glittery ribbon, not glitter on everything.
Faux flowers
Silk roses, peonies, or even small white blossoms mix so nicely with the mesh. You can tuck a few in around the edges or cluster them near a bow.
These extras are where your wreath goes from “store shelf” to “this is my home, my style, my family.” Let your kids pick one or two fun items and roll with it. The little personal touches are what you will smile at next year when you pull it out again.
Choosing colors and patterns that fit your style

Color choices can feel big, but they do not need to be stressful. Think about where your wreath will hang and what you already have in that space. Then pick colors that either blend in or pop in a fun way.
Here are some easy combos that work really well.
1. Classic red, pink, and white
This is the look most of us picture for Valentine’s Day.
- Red mesh for the base.
- Pink mesh or ribbon for softness.
- White accents to brighten everything.
This combo looks great on a front door and can be as bold or as soft as you want.
2. Soft pastels
If you like a gentler look, try:
- Soft pink.
- Blush or cream.
- Light lavender or pale mint.
Pastels look so sweet over a mantel or in a nursery or playroom. They feel calm and cozy, which I love when the rest of the day feels like a circus.
3. Bold red and black
If your home decor leans a little more modern, this combo is amazing.
- Deep red mesh.
- Black and white ribbon (buffalo check, stripes, or dots).
- Maybe a small pop of white or silver.
This works well if your house has black hardware or dark accents. It feels a little more grown up, but still fun.
4. Farmhouse neutrals with a touch of red
For a softer, farmhouse style, think:
- Burlap or tan mesh.
- Cream or white ribbon.
- A few bright red hearts or a red sign.
This is perfect if your home has shiplap, wood tones, or a lot of neutral decor. The red pops without feeling like a candy store.
No matter what palette you pick, remember one simple trick. Mix solids, stripes, and hearts to add texture. Too many solids can look flat. Too many prints can feel busy. A little mix keeps it interesting.
I like to lay my mesh and ribbon out on the table first and see how they look side by side. If it makes me smile, I go for it. There is no wrong choice here. If your kids love bold hearts and you love calm neutrals, blend a bit of both. It is your home, your wreath, and your Valentine story.
Step‑by‑Step: How I Make This Deco Mesh Valentine Wreath in a Single Day

Once I have my supplies ready, I like to move through this part in simple steps so I do not lose my mind or my scissors. This is where the fun starts and the deco mesh valentine wreath finally begins to look like something more than a pile of rolls and pipe cleaners on the table. I break it into little chunks I can do between snacks, spills, and “Mom, look at this!” moments.
Get your workspace and wreath form ready

First, I claim a flat surface that the boys cannot easily reach. For me, that is usually the dining table or a counter. If you have tiny hands or curious pets, try to set up in a spot where you can leave things out for a bit without them walking off with your ribbon.
I spread out an old tablecloth or a large trash bag over the surface. This catches all the tiny mesh strings and random glitter pieces. When I am done, I just fold it up and toss it, instead of scrubbing the table for 20 minutes.
Next, I grab my wire wreath form and my pipe cleaners. I like to use pieces that are about 8 inches long. You can cut longer ones in half if they are extra long. Then I attach them all the way around the form before any mesh touches the frame. That way, once I start adding mesh, I can just twist and move, not stop and cut.
Here is how I space them:
- I place one pipe cleaner on every crossbar, wrapping it tightly around the outer two wires and twisting it once or twice.
- Then I place one pipe cleaner in between each crossbar on the main ring, so it sits in the open space, not just where the bars meet.
In simple words, you want little “antenna” all the way around the wreath. Each one will hold a bunch of mesh. I point the pipe cleaner ends straight up, like little arms waiting for a hug, so I can easily grab them later. The goal is even spacing, not perfection. If they are mostly the same distance apart, you are good.
Once every section has a pipe cleaner or two, I give the frame a quick check. If I see a big open area with no pipe cleaner, I add one more. A few extra never hurt.
Cutting and prepping your deco mesh like a pro
Now comes the part that looks a little messy but feels satisfying. I set one roll of mesh at a time at the edge of the table and unroll a section. I use my hands to smooth it out gently so it lays flat. It does not need to be perfect, just not super twisted.
For a nice full wreath, I like to cut my mesh into pieces that are about 8 to 12 inches long. Shorter pieces give a tighter, more ruffled look. Longer pieces feel looser and fluffier. For my Valentine wreath, I usually land around 10 inches. It is a sweet spot between full and not too time consuming.
I measure the first strip with my scissors or a small ruler, cut it, then use that first piece as a guide for the rest. I lay it over the roll, line up the edge, and cut along that line. This keeps the pieces pretty close in size without a lot of thinking.
There are two simple ways to use the mesh:
- Poof method: You keep the mesh in one long strip and make big loops that you attach as you go, like a fluffy garland moving around the wreath.
- Ruffle method: You cut separate pieces, pinch each piece in the center so it looks like a bow tie or little ruffle, then attach those one by one.
Both look cute, but for busy mom brains, I like to stick with the ruffle method. It is easier to pause and restart. You can stop after a few ruffles, answer a “Mom, I spilled milk!” call, then come back without losing your place.
To help stop fraying:
- I use sharp scissors and make clean, straight cuts. No sawing back and forth.
- I handle the cut edges gently and try not to pull or stretch them too much.
- I stack finished pieces in neat piles by color so they are not sliding all over the table.
Some fraying is normal. I just snip off any wild strings at the end.
Attaching mesh to the wreath form for a full, fluffy look

Now the fun part. Time to start building that full, fluffy ring of color. I grab one mesh piece, pinch it right down the center with my fingers, and scrunch it together so it looks like a little bow or ruffle. That center pinch is what will sit in the pipe cleaner.
I pick any starting point on the wreath frame and place that pinched center right into the waiting pipe cleaner “arms”. Then I twist the pipe cleaner tightly a few times to lock the mesh in place. I do not worry about how it looks just yet. It will puff out more as I add neighbors around it.
To keep things pretty and balanced, I like a simple color pattern. For Valentine’s Day, an easy one is:
- One red ruffle
- One pink ruffle
- One white ruffle
- Repeat
If I use patterned mesh, I might go:
- One solid color
- One pattern
- One solid color
I move around the wreath, filling each pipe cleaner with one or two pieces, depending on how full I want it. Some people like to put two ruffles per pipe cleaner. For a super fluffy look, that is amazing. If you are watching your supplies, one per twist still looks very cute.
As I work, I:
- Fluff each piece a bit so the ends spread out and cover the wire.
- Tuck the twisted pipe cleaner ends into the mesh so they do not poke out.
Every few minutes, I stop and step back from the table. I look for thin spots or spots where one color feels too heavy. If one area looks too red, I add an extra pink or white. The goal is a soft mix, not big blocks of one color.
If I see a bare patch where the frame shows, I just untwist one pipe cleaner, slide in another ruffle, and twist again. Deco mesh is forgiving. It really wants to help you.
Layering in ribbon, hearts, and cute Valentine accents

Once the wreath looks full of mesh, it is time to dress it up. This is my boys’ favorite part, because they finally see hearts and sparkle.
For ribbon, I like to cut ribbon tails that are about 8 to 10 inches long. I stack 2 different ribbons, maybe a solid and a print, then pinch them together in the center just like the mesh ruffles. I open up a pipe cleaner that already holds mesh, place the ribbon pinch right on top, and twist again. The pipe cleaner holds both the mesh and the ribbon without a problem.
To make it look nicer:
- I trim the ribbon ends at an angle or into a V shape by folding the end in half and cutting toward the fold.
- I bend the ribbon gently with my fingers to make soft curves and loops instead of flat strips.
If I want a bigger bow, I make simple loops by folding the ribbon back and forth into a small bundle, like a figure eight, then tie the center with a pipe cleaner. That big bow can sit at the bottom or off to the side as a little focal point.
For accents, I use:
- Heart picks tucked into the mesh. I wrap a pipe cleaner around the stick and twist it onto the frame so it does not wiggle.
- Small signs wired right to the metal frame with floral wire or pipe cleaners. I try to anchor signs in at least two spots so they do not swing when the door opens.
- Little flowers slipped between mesh ruffles. I attach the stems to the wire ring so curious hands cannot pull them out easily.
I remind myself that more texture usually looks better than less here. Mesh, ribbon, hearts, flowers, a tiny sign. It all works together. If something feels like “too much,” I just pull that one piece out and try it in another spot.
Fluffing, shaping, and hanging your finished wreath

The last step is where everything comes to life. I place the wreath upright and start gently fluffing. I pull mesh loops forward, spread out the ruffles, and straighten any ribbon tails that got squished.
I run my fingers around the wreath and look for:
- Gaps where I can see the wire frame.
- Spots where one color looks too thin.
- Pipe cleaner tips that are still showing.
If I find a gap, I add one or two extra mesh pieces right into an existing pipe cleaner. If all the pipe cleaners are full, I wrap a new one straight around the metal ring and tuck in another ruffle. It does not need to be fancy.
For hanging, I like easy options:
- A wreath hanger over the top of the door.
- A wide ribbon loop tied to the frame and hung on a nail.
- A clear hook stuck to the door if I want a cleaner look.
Once it is up, I step back into the hallway and really look at it. The boys usually run over and point out “their” hearts or the ribbon they chose. It hits me that we pulled this together in a single day, between snacks and school runs and bedtime battles.
That little moment, seeing something bright and happy on the door, makes the mess and the glitter worth it. It reminds me that even on the craziest days, I can still squeeze in something pretty for our home.
Easy Ways to Customize Your Valentine Wreath for Your Family

Once the basic deco mesh valentine wreath is fluffed and pretty, this is where the fun really starts. This is the part my boys love, because it turns a “pretty wreath” into our family wreath, with our colors, our names, and all the little details that make it feel special.
You do not need fancy supplies or a big budget to customize it. A few smart color choices, some simple letters, and tiny love notes can turn one wreath idea into something perfect for your front door, your kids’ teachers, or Grandma’s house.
Color and theme ideas for different vibes

Color is the fastest way to change the whole mood of your wreath. I like to think about where the wreath will hang and who it is for, then pick a simple theme that fits that space.
Here are a few easy styles that work really well.
Classic red and pink for the front door
This is the “Valentine card” look that everyone expects, in the very best way.
- Red mesh or ribbon for the base
- Pink and white accents
- A few hearts or a sweet “Love” sign
I like this one for the front door, because it reads clearly from the street and feels happy and bright. It is also great if you want one main wreath that works for the whole family and you do not want to overthink it.
Kid-focused and playful for bedrooms or playrooms
When my boys get a say, things get bold and silly fast, and honestly, it is adorable.
Think:
- Bright pink, red, purple, or even teal
- Cartoon-style hearts, smiley faces, or cute animals
- Ribbon with “XOXO,” emojis, or comic-style prints
This look works so well on a bedroom door, playroom, or even near a homework station. It feels like a Valentine party, not formal decor. Let your kids pick one or two ribbons or heart picks. Their choices might not match perfectly, but the joy is worth it.
Farmhouse style for cozy, neutral spaces
If your home leans more neutral or you love that calm farmhouse feel, you can still do Valentine’s Day without going full bubblegum pink.
Try:
- Burlap or tan mesh as the base
- Cream, white, or soft gray ribbon
- Small pops of red hearts or a simple wooden “Love” sign
This style looks beautiful in a kitchen, entryway, or above a mantle. It feels warm and cozy, like a favorite sweater with a tiny red heart pin.
Glam and sparkly for Grandma or a special spot
Sometimes, you just need a little sparkle. My mom loves anything glittery, so a glam version is perfect for her.
Ideas:
- Deep red or hot pink mesh
- Metallic gold or silver ribbon
- Glitter hearts and a shiny center sign
This is a sweet option for Grandma’s house, a formal dining room, or even a teen girl’s room. It catches the light and feels a little fancy, which can be a fun change from the usual kid chaos.
You can also mix themes. Classic red and pink can still have a tiny farmhouse twist with one burlap ribbon, or a kid-focused wreath can borrow a glam metallic bow. If it makes you smile when you step back, you picked the right vibe.
Adding names, initials, or little love notes
Once the colors feel right, I love to sneak in some personal touches. Names, initials, and tiny “love notes” make the wreath feel like a family story, not just decor from the store shelf.
Wooden letter for your last name
A single wooden letter is simple and bold, and it looks like it belongs right in the center.
Here is how I do it:
- Pick a wood or MDF letter that matches your last name.
- Paint it to match your theme, or leave it natural for farmhouse style.
- Use hot glue or floral wire to attach it to the metal frame or a sturdy mesh section.
For a front door wreath, I like a white letter on top of red and pink mesh. It pops nicely and helps guests find the right house faster too.
Chalkboard tags with kids’ names
This is my boys’ favorite part. Tiny chalkboard tags feel like mini name plates, and they are so easy.
- Grab a pack of small chalkboard labels or tags.
- Write each child’s name in paint pen or chalk marker.
- Tie or wire the tags onto the wreath, tucked near pretty ribbon or hearts.
You can cluster all the kids’ names on one side, or spread them around the wreath. I let each boy pick where “his” tag goes, which makes them extra proud.
Mini envelopes with pretend love notes
This idea is cute for kids, teachers, or grandparents. Little envelopes look like the Valentine cards we used to pass out at school.
To make them:
- Buy or cut small paper or felt envelopes.
- Write short notes on tiny pieces of paper, like “We love you,” “You are kind,” or “Thank you for all you do.”
- Tuck the notes inside and close the flap.
- Use hot glue, string, or small clothespins to attach them to the wreath.
If your kids are old enough, let them write or draw their own “notes.” Hearts, smiley faces, or wobbly handwriting are perfect. Nothing has to be neat. The little scribbles are what Grandma will keep pointing at.
Kid-friendly ways to help
To keep this low stress, I give each child a simple job:
- Write their own name on a tag
- Draw tiny hearts or stars on blank tags
- Color a wooden heart or letter with markers
- Pick which envelope belongs where
They feel involved, and I am not guarding the hot glue gun every second. It turns into a sweet little family project, not a solo “do not touch this” moment.
Turning this wreath idea into gifts teachers and grandparents will love

Once I realized how easy it was to customize one wreath, I started making smaller versions as gifts. Teachers, grandparents, and even our babysitter have all gotten their own little Valentine wreath, and they light up when the boys hand it over.
You do not need a whole new plan. You can use the same basic steps and supplies, just on a smaller scale.
Make mini wreaths for teachers
For teachers, I like to use a smaller wire frame or even a heart-shaped one, so it fits on a classroom door or bulletin board without taking over.
Here is a simple way to personalize it:
- Let each child pick the main colors for their teacher.
- Use one neutral base mesh, like white or soft pink.
- Add one or two ribbons in the teacher’s favorite color, or the school colors.
- Attach a small chalkboard tag that says “Mrs. Smith” or “Best Teacher.”
You can stop right there and it will already look thoughtful and sweet. Teachers love anything that feels personal and made “just for them,” especially when kids helped.
Create a special design for grandparents
Grandparents usually care more about the kids’ faces than the decor style, so I like to pull them into the design.
Some ideas that have worked really well:
- Use softer colors, like blush, cream, and a touch of red.
- Add wooden hearts with each grandchild’s name.
- Tuck in mini envelopes with “We love you, Nana” notes inside.
- Clip on one or two small printed photos with tiny clothespins.
A wreath like this looks beautiful on a front door, but also inside near a family photo wall. My mom kept hers up long past Valentine’s Day, which made my boys so proud.
A simple way to wrap and deliver the wreath
When the wreath is done, I try to make the “gift” part feel special but still easy.
I usually:
- Lay a sheet of tissue paper on the table.
- Set the wreath face down in the center.
- Gently fold the tissue around the edges, so the mesh does not snag.
- Place it in a gift bag or a large reusable shopping bag.
Then I have each child write a short note, even if it is just “Happy Valentine’s Day” and their name in big letters. We tuck the card into the bag, and they get to carry it in and hand it over.
That moment, when a teacher or Grandma bends down and says, “You made this for me?” is always the best part. The wreath is pretty, but the story behind it, tiny names, little hearts, and wobbly letters, is what makes it a keepsake.
Storage, Care, and Quick Fixes So Your Wreath Lasts for Years
After putting love, time, and energy into a deco mesh valentine wreath, I really want it to last for several years, not just one fast February. With three boys who think every door is a raceway, I have learned a few simple tricks to keep my wreath fluffy, bright, and fixable, even in a busy house.
How to store your deco mesh wreath without crushing it
Good storage does not have to be fancy. It just has to keep your wreath clean, dry, and not smashed under 12 winter coats and a soccer ball.
Here are a few easy storage ideas that work in a real home with kids and limited space.
1. Hang it in a closet
If you have even one extra hanger or hook, this is such a simple option.
- Slip a wreath hanger or a sturdy ribbon loop through the frame.
- Hang it on a closet rod, a hook on the wall, or the back of a spare room door.
- Make sure it is not rubbing against sharp zippers or buttons that can snag the mesh.
I love this for inside closets, because it stays away from dust, heat, and grabby hands. It also keeps the wreath from getting crushed under bins or bags.
2. Use a wreath storage bag
If you have a tiny bit of space in a closet or under a bed, a wreath bag is a nice upgrade.
Look for:
- A soft fabric or plastic wreath bag that zips.
- A size that is just a little bigger than your wreath, not tiny.
Before I zip mine up, I do a quick check:
- Gently tuck in any long, fragile picks so they do not bend.
- Turn big bows so they sit softly, not smashed under the frame.
Then I store the bag upright if possible. If it has a hanger, I hang it on a closet rod. If not, I slide it onto a shelf where it will not have a heavy bin on top of it.
3. A large plastic bin that fits under a bed or on a shelf
If hanging space is tight, a basic bin can still work really well.
Here is how I make it work without flattening everything:
- Pick a bin that is wide and shallow, not super deep.
- Line the bottom with tissue paper or a clean pillowcase.
- Lay the wreath face up, not face down.
- Gently tuck in any picks or loose bits toward the center.
- Add a light layer of tissue on top, then close the lid.
I write “Valentine wreath, do not stack” on the lid in big letters, because my boys love to pile things. Then I slide the bin under a bed, on a closet shelf, or even on top of the fridge in the garage if I am desperate for space.
4. Keep it away from heat and moisture
No matter where I store it, I try to avoid:
- Hot attics that bake everything.
- Damp basements or garages with leaks.
- Spots right next to a heater or vent.
Heat can warp glue and fade colors. Moisture can make metal frames rust or mess with certain ribbons. A cool, dry closet really is your wreath’s best friend.
Before I walk away, I give the wreath one last quick fluff and tuck. I push any fragile hearts, wire picks, or wood signs closer to the frame so nothing sticks out and bends.
It takes two extra minutes, and future me is always grateful when I pull it out next year and it still looks cute.
Fixing flattened mesh and loose decorations
When I pull out my wreath after a year in storage, it almost always looks a little tired at first. The good news is that deco mesh is very forgiving and easy to revive. This is why I love this project so much. Even if the kids bump it with a backpack, it is usually a fast fix, not a full redo.
Fluffing up flattened mesh
If your wreath looks squished, here is what I do:
- Hang the wreath at eye level or lay it flat on a table.
- Start on one section, not the whole wreath at once.
- Gently grab each mesh loop or ruffle and pull it forward.
- Use your fingers to separate the layers, like you are fluffing hair.
- Twist the mesh a little near the base if it looks stuck in one direction.
Sometimes mesh just needs air and a little attention. I also spin the wreath and look for flat spots, then work those with my hands until they bounce back.
If one piece looks really crushed, I do not stress. I untwist that pipe cleaner, pull the damaged piece out, and replace it with a fresh ruffle from leftover mesh. It blends right in.
Fixing loose ribbon tails or bows
With kids slamming the door or brushing by with backpacks, ribbon can loosen over time.
Here are my quick fixes:
- If a ribbon tail is slipping out, I open the pipe cleaner, slide the ribbon back into the twist, then twist the pipe cleaner tighter.
- If a bow looks crooked, I grab the center and gently twist it back into place, then bend the loops with my fingers until they sit how I want.
- If a ribbon keeps popping out, I add one small dot of hot glue at the back where the ribbon meets the mesh, just for extra hold.
I try not to over-glue things, because I like to be able to move them later. One dab at the base is usually enough.
Reattaching loose hearts and picks
Those cute heart picks and signs sometimes wiggle free, especially when little hands “just touch it a tiny bit.”
When that happens, I use:
- Pipe cleaners for anything with a stem or a hole.
- Hot glue for flat pieces like foam hearts or flat wood shapes.
For picks with a stem:
- Place the stem against the wire frame.
- Wrap a pipe cleaner around both the stem and the frame.
- Twist tight and tuck the ends into the mesh so they do not show.
For a flat heart or sign:
- Add a small line of hot glue where it will touch the mesh.
- Press it gently into a thick, full section of mesh.
- Hold it in place for a few seconds so it sets.
If a big sign feels wobbly, I attach it in two or three spots instead of just one. That keeps it steady even when the door moves.
Why this wreath is low stress in a house full of kids
The best part of this whole project is how fixable it is. Deco mesh hides a lot of little oops moments. If someone dents one side, I fluff it. If a heart falls off, I twist or glue it back. If a ribbon gets pulled, I tuck it in again.
Nothing about this wreath feels too precious or fragile. It can handle real family life, which is exactly what I need in a home with three busy boys, constant snacks, and doors that never stop opening and shutting.
With a little smart storage and a few quick touch-ups, your wreath can come out year after year, looking just as sweet as the day you made it.

Conclusion
This little deco mesh valentine wreath really is a one-day project, even in a house full of kids and snack breaks. I love how simple the flow is. I just gather my supplies, prep the wire form, add the mesh in easy ruffles, layer in ribbon and hearts, then fluff it up and hang it. That is it. No fancy tools. No perfect technique needed.
As a mom of three busy boys, I need projects that work in real life. This one fits into nap time or those quiet pockets after bedtime. I can pause when someone spills milk, then jump right back in and keep going. It feels good to finish something pretty in a single day and see it on the door when we race out to school the next morning.
The best part is how much I can personalize it. You can pick colors that match your home, add hearts your kids choose, tuck in names, or keep it simple and sweet. Make it bright and playful for the playroom, or soft and cozy for the entry. Let it fit your family and your style.
I hope you feel excited and confident to try your own. If you make one, snap a picture and share it with your friends or family so they can make one too!
This post may contain affiliate links. Read the full disclosure here.


Love all your wreaths. Where do you get the mesh? It is beautiful.
Thank you,
Sherry Cooper